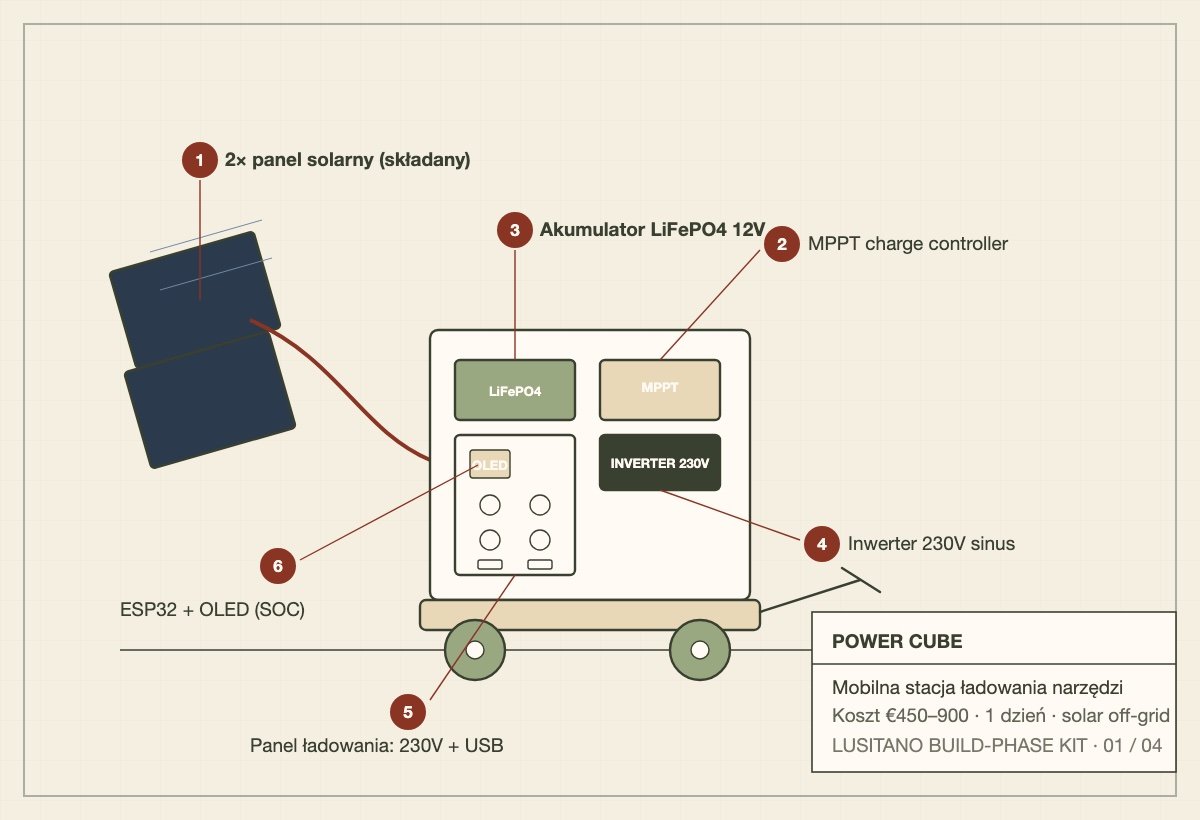
1. 1 Securing the land
  2. 2 Licensing
  3. 3 21-day build
  4. 4 Open retreat

Acquisition stage: actively reviewing land and rural property opportunities near Porto, Braga, and the wider North Portugal corridor.

Build-Phase Kit — Site Enablers

Before the Build, the Camp

A 21-day build sprint on raw land stalls on the boring things first: no power for the drills, no water for mortar, nowhere to go on day one. These four enablers are built before anything else — the camp that makes the camp possible.

  • Day-0 Priorities
  • Pallets + IBC
  • Off-Grid
  • Crew of 2

Why a build-phase kit?

The build fails on logistics, not vision

Power, water, sanitation and tools are what actually decide whether a volunteer crew has a good week or quits by Wednesday. Each of these four is a half-day to a one-day job for two people, mostly from pallets, an IBC and salvage already mapped in our Braga sourcing list — and each one removes a problem that would otherwise stop the whole site.

The four enablers

What we build first

Day-0 · Essentials

The first four things to build — without these the sprint stalls on day one.

Build schematic of the Power Cube mobile solar tool-charging station

01 / 04

Power Cube

A solar toolbox that keeps the drills alive

LiFePO4 + SolarCharges tool batteriesSilent, no fuel

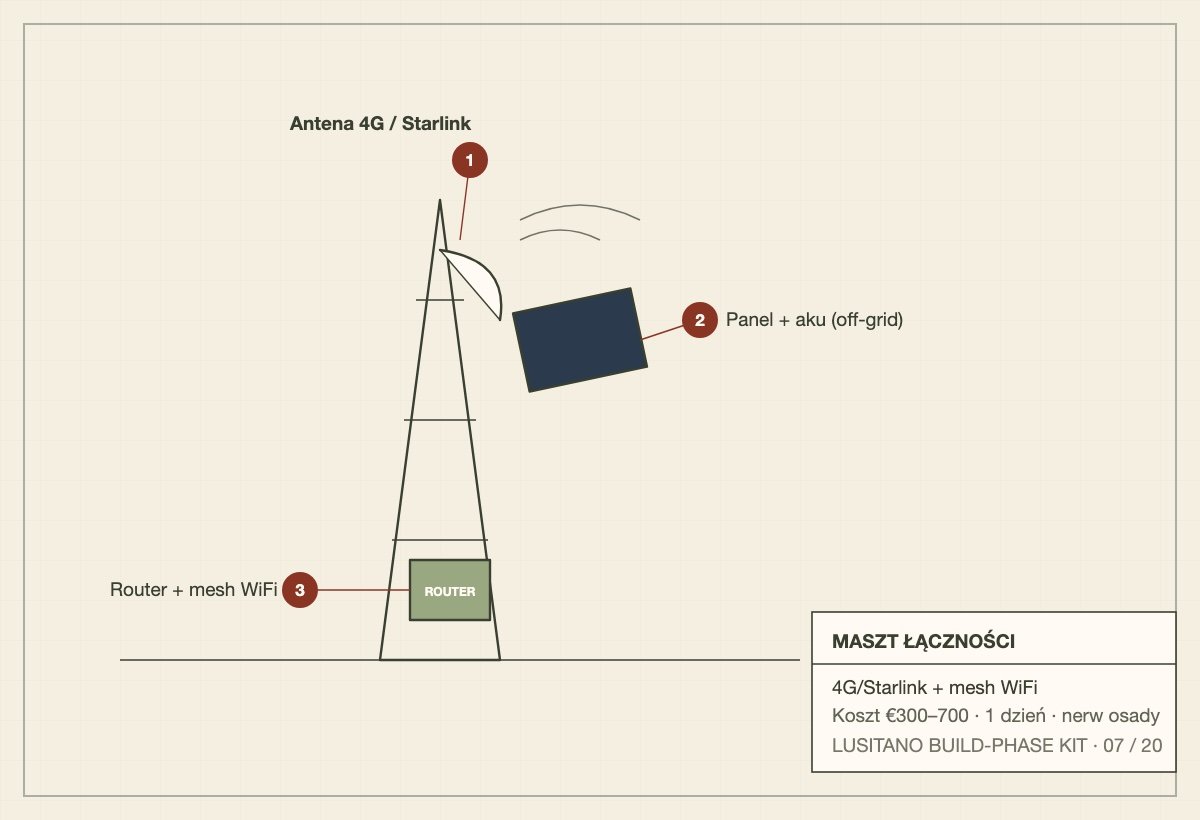
The problem it solves: With no mains on site, cordless tool batteries die within two hours and the whole crew stands idle waiting for a town charge. A generator means fuel runs and noise all day.

What it is: A rugged box on a hand cart holding a LiFePO4 battery, an MPPT controller and a pure-sine inverter, fed by two folding solar panels — with a front panel of 230V sockets and USB to charge every tool battery and phone on site.

Main parts

  • LiFePO4 12V battery + MPPT charge controller
  • 2× folding solar panels
  • Pure sine wave inverter (230V)
  • ESP32 + OLED battery monitor (links to the site dashboard)
  • Sockets, USB, main switch, fuses, weatherproof box + cart

Build steps

  1. Mount battery, MPPT and inverter inside the box with fuses between each.
  2. Wire the front charging panel: AC sockets, USB and 12V outputs behind a main switch.
  3. Fit the ESP32 monitor and OLED so the crew can see state-of-charge at a glance.
  4. Stand the panels each morning; the cube rolls to wherever the work is.

Rough cost: €450–900 Effort: 1 day · solar off-grid

Build schematic of the Water Donkey — IBC tank on a cart with a 12V pump

02 / 04

Water Donkey

1000 litres of build water, wherever you need it

1000 L12V pressureRolls to the work

The problem it solves: Mortar, render, dust control and washing all need water — and carrying buckets across a site kills hours every day. The well or delivery point is never where the work is.

What it is: A food-grade IBC tank strapped to a cart or pallet, with a 12V pump and a hose so water reaches any corner of the site under pressure. It is also the first real-world job for the Tank Monitor from the Tech Lab.

Main parts

  • 1000 L food-grade IBC (OLX ~€45)
  • 12V diaphragm pump + hose and spray nozzle
  • Pallet or two-wheel cart base
  • Tank Monitor (level on your phone) — optional tie-in

Build steps

  1. Strap the IBC to a pallet or wheeled cart so one person can move it.
  2. Plumb the 12V pump to the outlet; run a hose with a trigger nozzle.
  3. Fill from the well, a delivery or rainwater; top up as the build runs.
  4. Drop the Tank Monitor on top to see the level without climbing up.

Rough cost: ~€90 Effort: 1 person · half a day

Build schematic of a twin compost toilet block with a tippy-tap handwash station

03 / 04

Compost WC + Wash

Day-1 sanitation, not day-10

Twin cabinsSawdust systemHandwash + soakaway

The problem it solves: Ten-plus people on a site with nowhere to go is a crisis on the morning of day one — and improvised solutions become a hygiene and goodwill problem fast.

What it is: A simple twin-cabin composting toilet block from pallets and OSB with vent pipes and sawdust, paired with a foot-operated tippy-tap handwash station and a soakaway. Clean, dignified, and legal to remove later.

Main parts

  • Pallets + OSB for two cabins, doors and seats
  • Two buckets/drums + sawdust supply
  • Vent pipes with fly screen
  • Jerry can + foot pedal (tippy-tap) + soap, draining to a soakaway

Build steps

  1. Frame two cabins from pallets; clad with OSB and hang simple doors.
  2. Set a bucket-and-sawdust system under each seat with a vent pipe.
  3. Build the tippy-tap: a tilting jerry can on a foot cord beside the cabins.
  4. Dig a small gravel soakaway for the handwash greywater.

Rough cost: ~€150 Effort: 2 people · 1 day

Build schematic of a lockable tool shed with a shadow board and sign-out log

04 / 04

Tool Depot

A shadow board that spots a missing tool in five seconds

LockableShadow boardSign-out log

The problem it solves: Tools get rained on, wander off, or vanish overnight on an open site. By week two nobody knows what is missing, and a stolen drill stalls a whole task.

What it is: A lockable shed or container with a shadow board — every tool painted as a silhouette so a glance shows what is out or gone — plus bins, shelves and a simple sign-out sheet.

Main parts

  • Lockable shed / second-hand container + padlock
  • Plywood shadow board + paint for the silhouettes
  • Bins and shelving for fixings and consumables
  • Clipboard sign-out log (who has what)

Build steps

  1. Site a lockable shed or container near the main work zone.
  2. Hang a plywood board; outline each tool in paint as you place it.
  3. Add bins and a shelf for screws, blades and consumables.
  4. Run a one-line sign-out sheet so tools come home each evening.

Rough cost: €150–400 Effort: 1 person · 1 day

Build the camp · Days 0–3

The rest of the working camp — once power, water, sanitation and tools are up, these keep the sprint flowing.

Schematic of a staging yard with lumber rack, pallet stacks and zone markers

05 / 04

Staging Yard

A place for everything, so nothing is lost

Lumber rackZone signsDry storage

The problem it solves: Pallets, stone and timber dumped in one pile get rained on, walked over and impossible to find — the build slows to a treasure hunt.

What it is: Marked storage zones with a covered lumber rack and clear zone signs, so every material has an address and the 12 build zones map onto the ground.

Main parts

  • Posts + timber for a covered lumber rack
  • Gravel/pallet bases for stacking zones
  • Painted zone marker posts (A–L)

Build steps

  1. Mark out storage zones beside the main work area.
  2. Raise a simple covered rack for sawn timber off the ground.
  3. Sign each zone so anyone can find and return materials.

Rough cost: ~€120 Effort: 1 day

Schematic of an A-frame command board with daily mission cards and weather

06 / 04

War Board Kiosk

The crew knows the plan before coffee

Mission cardsAssignmentsDone means done

The problem it solves: Without a single source of truth, every morning starts with ten people asking what to do — and the answer changes by lunch.

What it is: A weatherproof A-frame command board holding the day's mission cards (we have 21 ready), the weather, crew assignments and a clear 'done means done' column.

Main parts

  • A-frame timber + plywood board + cover
  • Card pockets / magnetic grid
  • Printed daily mission cards (EN/PT)

Build steps

  1. Build a tilted A-frame board under a small roof.
  2. Lay out a grid: today, doing, done, plus weather.
  3. Run the morning standup at the board, every day.

Rough cost: ~€80 Effort: half a day

Schematic of a communications mast with 4G/Starlink antenna, solar panel and router

07 / 04

Comms Mast

Coordination, content and payments need signal

Test before you buy4G or StarlinkMesh WiFiRaised on day 1

The problem it solves: On a remote site with no signal there is no coordination, no live content, no card payments and no way to call for help fast. And you only find out how bad the signal is after you've committed to the land — unless you test first.

What it is: A two-phase system. Phase A: a €50 prepaid 4G hotspot used to measure real signal on every candidate site — coverage becomes part of the land due-diligence. Phase B: a 6 m guyed mast on a removable stone gabion base carrying either a 4G router with an outdoor MIMO antenna (if the site gets 20 Mbps+) or a Starlink dish (from €29/month if it doesn't), feeding 2–3 outdoor mesh WiFi nodes with separate crew and guest networks. The sensor modules and totem stay on their own radio link, so site telemetry keeps working even when the internet goes down — and the security camera runs on its own SIM, independent of the mast.

Main parts

  • Phase A: prepaid 4G hotspot (~€50) — doubles as a signal tester and permanent backup
  • 6 m mast + guy lines on a removable gabion base (no concrete)
  • 4G CAT6 dual-WAN router + outdoor MIMO antenna — or Starlink kit (~€300–350, from €29/month)
  • 2–3 outdoor mesh WiFi nodes (crew + guest networks)
  • Dedicated solar + LiFePO4 battery (Starlink draws 40–75 W — size it properly)

Build steps

  1. Before buying land: measure 4G on the site with the hotspot — it decides router vs Starlink.
  2. Sprint day 1, first job: build the gabion base, raise and guy the mast.
  3. Mount the antenna or dish and the router; power from a dedicated panel and battery.
  4. Day 2: place mesh nodes over the work, kitchen and sleeping zones.
  5. Day 3: connect the time-lapse camera, card terminal and the sensor gateway.

Rough cost: Phase A ~€50 · Phase B €550–1,300 Effort: Day 1 of the sprint — raised first

Schematic of a gravel pad, trackway mats and a drainage swale

08 / 04

Track & Drains

One storm shouldn't bog the whole site

Gravel padTrackwaySwale

The problem it solves: The first real rain turns the access and main path to mud — vehicles bog, barrows stop, and boots carry the site into every building.

What it is: A gravel pad and trackway mats on the entrance and main run, with a swale to carry water away — the drainage thinking from our 'pimp my land' research, done cheaply.

Main parts

  • Gravel / hardcore for the pad
  • Trackway mats or pallets for the main run
  • Spade work for a swale + a boot-wash point

Build steps

  1. Lay a gravel pad on the entrance and turning area.
  2. Run trackway mats along the busiest path.
  3. Cut a swale to lead rain away from the work zones.

Rough cost: €200–500 Effort: 1–2 days

Schematic of a covered field kitchen with a rocket stove, worktop and gravity sink

09 / 04

Field Kitchen

Fed volunteers stay; hungry ones leave

Rocket stoveWorktopGravity sink

The problem it solves: A crew with nowhere to cook or eat well burns out by mid-week — food is the cheapest retention tool on a build site.

What it is: A covered field kitchen with a rocket stove, a sturdy worktop and a gravity-fed sink — enough to feed a working crew three times a day without mains.

Main parts

  • Rocket stove (brick or salvaged steel)
  • Timber worktop + shelving under a roof
  • Gravity sink fed from the Water Donkey

Build steps

  1. Roof a simple frame for shade and rain.
  2. Build a rocket stove and a solid worktop.
  3. Plumb a gravity sink and a drain to a soakaway.

Rough cost: €150–300 Effort: 1 day · 2 people

Schematic of a safety station post with first aid box, extinguishers and GPS sign

10 / 04

Safety Station

On a remote site, 112 needs to know where

First aidExtinguishersGPS for 112

The problem it solves: An accident on isolated land without a procedure costs minutes that matter — and nobody can tell the ambulance where the gate is.

What it is: A clear safety post with a first-aid kit, fire extinguishers, PPE and a sign carrying the GPS coordinates and an emergency procedure in EN/PT (we already have the safety infographics).

Main parts

  • First-aid box + fire extinguishers + PPE
  • Marked post and weatherproof signage
  • Printed GPS coordinates + emergency steps (EN/PT)

Build steps

  1. Site one visible post central to the work area.
  2. Stock first aid, extinguishers and PPE on it.
  3. Sign it with GPS coordinates and the 112 procedure.

Rough cost: ~€200 Effort: half a day

Run the retreat · After opening

Once guests arrive, these turn a build site into a comfortable, self-running, low-cost retreat.

Schematic of a fire point with a dedicated IBC tank, pump and hose reel

11 / 04

Fire Point

Wildfire season is real here — be ready

1000 L reservePump + hoseFirebreak

The problem it solves: Norte Portugal sees serious wildfire risk in August and September — by the time you smell smoke it is too late to improvise.

What it is: A dedicated 1000 L water reserve with a petrol or 12V pump, 25 m of hose on a reel, and a cleared firebreak mowed around the settlement.

Main parts

  • Dedicated 1000 L IBC (not the build water)
  • Petrol / 12V firefighting pump + 25 m hose reel
  • Buckets, beaters + a mown firebreak strip

Build steps

  1. Stand a reserve IBC central to the buildings.
  2. Rig a pump and a hose reel that reach every structure.
  3. Mow and clear a firebreak around the settlement.

Rough cost: €250–500 Effort: 1 day

Schematic of a terraced gravel reedbed filtering greywater

12 / 04

Reedbed Greywater

Shower and sink water can't just run off

Plant filterAPA-compliantFeeds planting

The problem it solves: Greywater from showers and sinks cannot legally run into the land untreated (APA) — and a soggy, smelly patch ruins the experience.

What it is: A terraced gravel reedbed (or banana circle) that filters greywater through plants and stone, matching the Water Systems research and keeping you legal.

Main parts

  • Lined gravel beds + reeds / banana plants
  • Inlet + outlet pipework
  • Grease trap before the bed

Build steps

  1. Dig and line a terraced gravel bed below the wet rooms.
  2. Plant reeds; pipe greywater in through a grease trap.
  3. Lead the cleaned outflow to planting, not a watercourse.

Rough cost: €150–400 Effort: 1–2 days

Schematic of a glazed batch solar water heater with a black tank

13 / 04

Solar Water Heater

Hot showers without a gas bottle

Batch heaterNo gasSauna tie-in

The problem it solves: Heating water with gas means bottles, runs to town and a recurring cost the off-grid model is meant to avoid.

What it is: A batch solar heater — a black tank or coil in a glazed insulated box facing the sun — optionally tied to a heat exchanger on the sauna stove for cloudy days.

Main parts

  • Black tank or coil + glazing + insulated box
  • Cold-in / hot-out plumbing
  • Optional sauna-stove heat exchanger

Build steps

  1. Build an insulated, glazed box angled at the sun.
  2. Mount a blackened tank or coil inside it.
  3. Plumb cold in at the bottom, hot out at the top.

Rough cost: €80–200 Effort: 1 day

Schematic of an aluminium-can solar air heater with warm and cold ducts

14 / 04

Solar Air Heater

Beats winter damp in the caravans

Upcycled cansDries dampDaytime warmth

The problem it solves: Caravans and cabins go damp and musty through a Norte winter, which is uncomfortable and slowly wrecks soft furnishings.

What it is: An upcycled solar air heater — a panel of blackened aluminium cans in a glazed box — that blows warm, dry daytime air into a unit. A perfect Build Library upcycling module.

Main parts

  • Blackened aluminium cans + glazed box
  • Warm-air and cold-return ducts
  • Small 12V fan + thermostat

Build steps

  1. Build a can matrix in a glazed, insulated frame.
  2. Duct cold air in low and warm air out high.
  3. Add a small fan on a thermostat for daytime runs.

Rough cost: ~€60 Effort: 1 day

Schematic of a roofed arrival kiosk with a key safe and map

15 / 04

Arrival Kiosk

Self check-in when you aren't there 24/7

Key-safeBooking-linkedEN/PT

The problem it solves: You can't meet every guest in person, and a confusing arrival on remote land sets a bad tone for the whole stay.

What it is: A small roofed welcome stand with a code key-safe driven by the booking engine, a site map and the house rules in EN/PT.

Main parts

  • Roofed timber stand
  • Code key-safe (codes from the booking engine)
  • Printed map + rules (EN/PT)

Build steps

  1. Build a small sheltered stand at the entrance.
  2. Fit a key-safe whose codes come from the booking system.
  3. Add a clear map and arrival instructions in both languages.

Rough cost: €120–300 Effort: 1 day

Schematic of a wooden signpost with direction arms and a QR code

16 / 04

Wayfinding Signs

Guests find their own way, in two languages

EN/PT signsMapQR to pages

The problem it solves: On a spread-out site guests get lost and every little thing has to be explained in person, which eats the host's time.

What it is: Routed wooden direction signs in EN/PT, a map at the totem, and QR codes that open the module pages already live on the website.

Main parts

  • Routed / branded wooden signs
  • Signposts at key junctions
  • QR plates linking to the module pages

Build steps

  1. Map the main routes between zones.
  2. Rout and set direction signs in EN/PT.
  3. Add QR plates that open the matching web pages.

Rough cost: €100–250 Effort: 1 day

Schematic of a five-stream waste station with a three-bay compost

17 / 04

Waste Station

Less to haul off the mountain = less cost

5 streams3-bay compostLess haulage

The problem it solves: Twenty guests make a lot of waste, and hauling unsorted rubbish off remote land is expensive and frequent.

What it is: A clean five-stream sorting station with a three-bay compost and a bokashi bin, so most of what guests produce never leaves the land.

Main parts

  • Five labelled bins (EN/PT)
  • Three-bay timber compost
  • Bokashi bin for cooked scraps

Build steps

  1. Build a tidy, covered five-bin sorting point.
  2. Raise a three-bay compost beside the food garden.
  3. Sign each stream clearly so guests sort it right.

Rough cost: €120–250 Effort: 1 day

Schematic of a pedal-powered washing drum and a covered solar drying line

18 / 04

Pedal Washer + Drying

Laundry without the launderette bill

Pedal-drivenSolar dryingOn-site laundry

The problem it solves: Sending bedding to a launderette in Braga every changeover quietly eats the margin on every stay.

What it is: A pedal-powered washing drum and a covered solar drying line — laundry on site, a neat tie-in with Pedal Power, and great content.

Main parts

  • Drum on a stand + pedal drive (like Pedal Power)
  • Covered solar drying line
  • Greywater run to the reedbed

Build steps

  1. Mount a drum on a stand with a pedal/crank drive.
  2. Rig a covered line that dries in sun and shelter.
  3. Send the wash water to the reedbed.

Rough cost: €100–200 Effort: 1 day

Schematic section of an earth-banked root cellar with shelves

19 / 04

Root Cellar

A larder that needs no electricity

Earth-cooledStone buildNo power

The problem it solves: Solar power is precious, and running fridges for bulk produce wastes the energy guests and the build actually need.

What it is: An earth-banked root cellar dug into the slope, built with stone from the land (a Stone Craft tie-in), holding vegetables and ferments cool without power.

Main parts

  • Stone from the land + insulated door
  • Drainage + a vent for airflow
  • Timber shelving + zeer pots

Build steps

  1. Cut into the slope and build stone walls.
  2. Roof, earth-bank and fit an insulated door.
  3. Add shelving, a low vent and a drain for cool, stable air.

Rough cost: €150–400 Effort: 2–3 days

Schematic of a solar security node with a 4G camera and PIR sensor

20 / 04

Security Node

An empty site off-season is a target

4G solar camMotion alertLock + insure

The problem it solves: A remote settlement sitting empty out of season invites theft and damage — exactly the risk the board flagged on the electronics.

What it is: A solar-powered 4G camera node with a motion sensor and lockable shutters, so the site can be watched and closed down between seasons. Pair it with a contents insurance policy.

Main parts

  • Solar 4G camera + PIR motion sensor
  • Lockable shutters for the valuable stores
  • Padlocks + a contents insurance policy

Build steps

  1. Mount a solar 4G camera covering the main stores.
  2. Add a PIR sensor and an alert to your phone.
  3. Fit shutters and locks; insure the contents.

Rough cost: €150–350 Effort: half a day

How to read these

Build schematics, not photos

These are working drawings, not finished objects — the point is to show what each enabler is, what it costs and how it goes together, so a volunteer crew can build it from pallets, an IBC and salvage on the first days of the sprint. Costs are rough targets; the Power Cube is also being detailed as a full electronics design.

Lusitano Retreat

Want to build the camp with us?

Join the waitlist to follow the 21-day sprint — or come help raise the Power Cube, the Water Donkey and the rest in the first week.